您当前的位置:首页 > 电脑百科 > 程序开发 > 框架

SpringBoot+Mysql做登陆接口,抛弃mapper.xml

时间:2021-03-08 16:48:09  来源:今日头条  作者:程序员新资讯

1.创建Springboot项目

开发工具我们采用IntelliJ IDEA,环境安装不在叙述,如果对环境搭建不会的朋友,可以评论或私聊,本人后期在写一章环境搭建,MySQL安装的文章:

  1. 打开IntelliJ IDEA , new Project 或 File -> New -> Project... ;
  2. 选择 Spring initializr ,选择对应的Project SDK后 点击Next ,如果Project SDK没有可选项,请先安装sdk,
  3.  

如上图所示 Group 修改为自己的报名,推荐为域名+项目名,比如** www.td0f7.cn.springboot01* * Artifact 为自己的项目名称,英文可以下划线比如spring_boot_demo type 为包管理方式,如果不了解这两种推荐用默认的方式即可,不用修改 Lauguage 为开发语言,默认为JAVA,可自行修改 Packaging 为打包方式,本人习惯用war所以选择war方式 Java Version 为开发语言的版本号,我本地java版本号是8,所以选择8

SpringBoot+Mysql做登陆接口,抛弃mapper.xml


改动完成,点击 Next 出现第二个界面,在点击下一步

  1.  

Project Name是项目名称,修改成自己的即可,默认是上个界面带过来的,不用修改 Project location 为项目存储路径修改为自己的存储路径即可 点击Firish,等待加载完成

2.项目结构介绍

SpringBoot+Mysql做登陆接口,抛弃mapper.xml


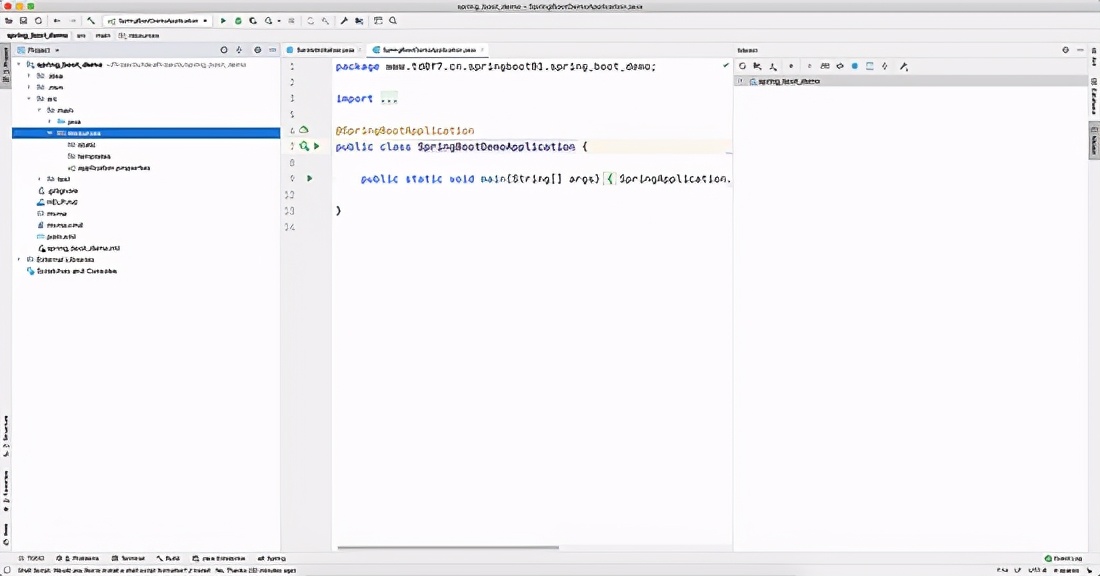
如图所示 根目录下 pom.xml 是包管理,引入一些新的jar包都在这,修改springboot版本号,修改打包方式等等 src main java 是写代码的地方 SpringBootDemoApplication 是程序主入口 resources 存储一些资源 application.properties 是配置文件,配置端口号,mysql,redis等等都在这里 static 是静态资源,js css 图片等 templates 放html界面

其他等教程用到在详细解释

3.引入mysql等包

由于新项目没有引入任何包,所以要引入数据库的包。 首先打开项目根目录的 pom.xml 在内容 dependencies 节点下添加

<dependencies>
    	<!--新添加的-->
        <dependency>
            <groupId>org.projectlombok</groupId>
            <artifactId>lombok</artifactId>
            <optional>true</optional>
        </dependency>
        <dependency>
            <groupId>mysql</groupId>
            <artifactId>mysql-connector-java</artifactId>
            <scope>runtime</scope>
        </dependency>
        <dependency>
            <groupId>org.mybatis.spring.boot</groupId>
            <artifactId>mybatis-spring-boot-starter</artifactId>
            <version>1.3.2</version>
        </dependency>
        <dependency>
            <groupId>com.google.code.gson</groupId>
            <artifactId>gson</artifactId>
            <version>2.8.6</version>
        </dependency>
				

		<!--项目自带的-->
        <dependency>
            <groupId>org.springframework.boot</groupId>
            <artifactId>spring-boot-starter-web</artifactId>
        </dependency>

        <dependency>
            <groupId>org.springframework.boot</groupId>
            <artifactId>spring-boot-starter-Tomcat</artifactId>
            <scope>provided</scope>
        </dependency>
        <dependency>
            <groupId>org.springframework.boot</groupId>
            <artifactId>spring-boot-starter-test</artifactId>
            <scope>test</scope>
        </dependency>
    </dependencies>
复制代码

lombok为实体类工具包,可以自动添加get set方法 mysql 是链接mysql数据库必须添加的包 org.mybatis.spring.boot 是mysql数据库的封装框架,更简易的操作数据库 gson 是对象转json字符串的工具类

4.修改数据库配置文件

打开项目根目录 src -> main -> resources -> application.properties 文件

spring.datasource.url=jdbc:mysql://mysqlip:端口/数据库名?useUnicode=true&characterEncoding=utf-8&serverTimezone=UTC&useSSL=true
spring.datasource.username=数据库账号
spring.datasource.password=数据库密码
复制代码

spring.datasource.url=jdbc:mysql://127.0.0.1/springboot?useUnicode=true&characterEncoding=utf-8&serverTimezone=UTC&useSSL=true
spring.datasource.username=springboot
spring.datasource.password=wangzhong
复制代码

mysql默认端口是3306,如果没有修改过端口号,则spring.datasource.url=的端口号可以省略不写

5.创建mysql数据库user表

CREATE TABLE `springboot`.`user` ( `id` INT NOT NULL AUTO_INCREMENT , `user` VARCHAR(30) NOT NULL , `pass` VARCHAR(30) NOT NULL , PRIMARY KEY (`id`), UNIQUE `u_user` (`user`) ENGINE = MEMORY;
复制代码

在mysql数据库执行这段mysql语句添加user表 id 主键自增 user 登录账号,不重复 pass 登陆密码

环境到这里就算完成了,接下来要写代码了

6.编写代码实现登陆接口

首先在 src main java 你的包 下 SpringBootDemoApplication 同级目录下创建 mapper controller entity 三个包 mapper 存储操作数据库的代码 controller 存储api的代码,前台调用的api都是这个下的 entity 存储数据库对应的实体类

首先是entity包下创建User实体类文件

import lombok.Data;

//@Data 注释会为我们自动给该实体类的属性添加 get set方法,必须引用了lombok包才可以使用
@Data
public class User {
    private int id;
    private String user;
    private String pass;
}

复制代码

创建UserMapper,名称一般为数据库表名+Mapper,类型为interface

import org.Apache.ibatis.annotations.Mapper;
import org.apache.ibatis.annotations.Select;
import www.td0f7.cn.springboot01.spring_boot_demo.entity.User;

//必须有这个注解,否则无法扫描到该mapper
@Mapper
public interface UserMapper {
    /**
     * @Select 代表查询语句
     * #{user} 代表 取该方法中 user参数
     * @返回值 登陆是查询,由于user登陆账号是唯一的,所有返回类型是一个User对象而不是集合
     */
    @Select("select * from user where user = #{user} and pass = #{pass}")
    User login(String user, String pass);
}

复制代码

创建UserController,给外部提供可调用的api

import com.google.gson.Gson;
import org.springframework.beans.factory.annotation.Autowired;
import org.springframework.web.bind.annotation.PostMapping;
import org.springframework.web.bind.annotation.RequestMapping;
import org.springframework.web.bind.annotation.RequestParam;
import org.springframework.web.bind.annotation.RestController;
import www.td0f7.cn.springboot01.spring_boot_demo.entity.User;
import www.td0f7.cn.springboot01.spring_boot_demo.mapper.UserMapper;

@RestController//如果返回值为对象,则自动转换成json
//@RequestMapping("user"),此注释代表这个controller需要+user才可以访问,如下
//我们启动的网站都是http://localhost:8080,要访问这个controller则是http://localhost:8080/user
@RequestMapping("user")
public class UserController {
    @Autowired(required = false)//自动扫描mapper文件
    private UserMapper mapper;

    /**
     * 该接口为post方式
     *
     * @param user 参数user默认值为空,不写defaultValue为null
     * @param pass
     * @return
     */
    @PostMapping("login")
    public String login(@RequestParam(value = "user", defaultValue = "") String user,
                        @RequestParam(value = "pass", defaultValue = "") String pass) {
        if (user.equals("")) return "账号必传";
        if (pass.equals("")) return "密码必传";
        User user1 = mapper.login(user, pass);
        if (user1 == null) {//没有查询到数据,代表没有此账号
            return "账号密码不正确!";
        } else {
            return new Gson().toJson(user1);//登陆成功则给对象转json字符串返回
        }
    }
}
复制代码

7.运行开始测试

数据库添加数据

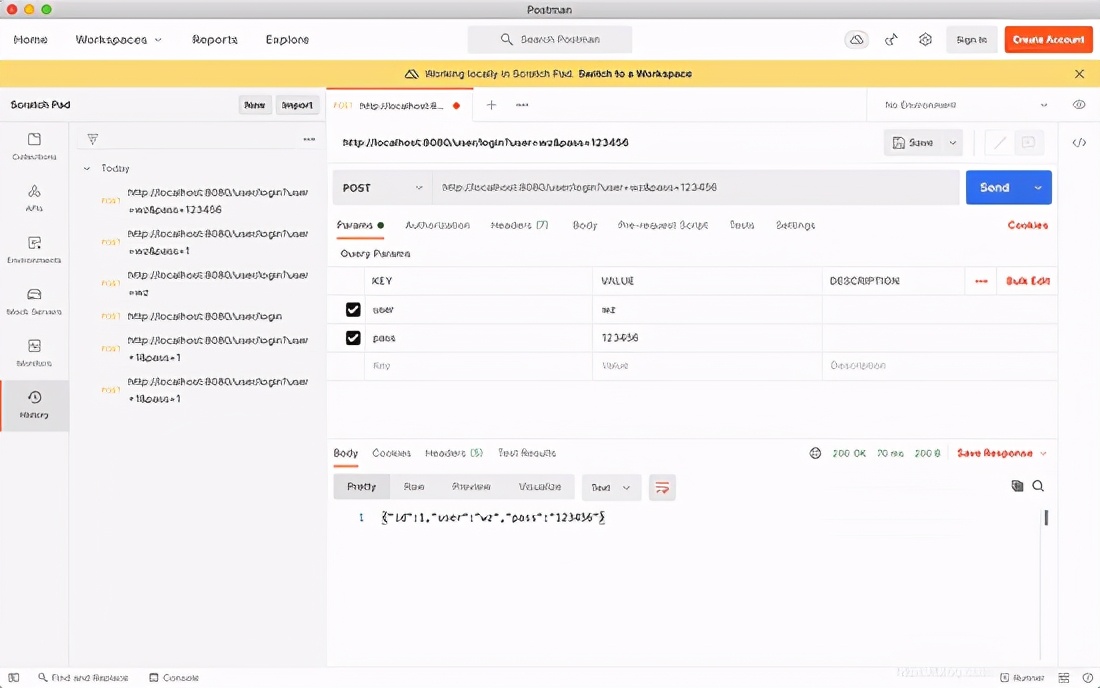
INSERT INTO `user`(`user`, `pass`) VALUES ('wz', '123456')
复制代码

以上添加了账号 wz 密码 123456 的数据

接下来运行项目测试

SpringBoot+Mysql做登陆接口,抛弃mapper.xml


使用postman测试

SpringBoot+Mysql做登陆接口,抛弃mapper.xml


SpringBoot+Mysql做登陆接口,抛弃mapper.xml


SpringBoot+Mysql做登陆接口,抛弃mapper.xml


SpringBoot+Mysql做登陆接口,抛弃mapper.xml


ok,登陆功能完成!!! 注册功能后期发布


Tags:SpringBoot   点击:()  评论:()
声明:本站部分内容及图片来自互联网,转载是出于传递更多信息之目的,内容观点仅代表作者本人,如有任何标注错误或版权侵犯请与我们联系(Email:2595517585@qq.com),我们将及时更正、删除,谢谢。
▌相关推荐
我是一名程序员关注我们吧,我们会多多分享技术和资源。进来的朋友,可以多了解下青锋的产品,已开源多个产品的架构版本。Thymeleaf版(开源)1、采用技术: springboot、layui、Thymel...【详细内容】
2021-12-14  Tags: SpringBoot  点击:(20)  评论:(0)  加入收藏
前言项目中的配置文件会有密码的存在,例如数据库的密码、邮箱的密码、FTP的密码等。配置的密码以明文的方式暴露,并不是一种安全的方式,特别是大型项目的生产环境中,因为配置文...【详细内容】
2021-11-17  Tags: SpringBoot  点击:(25)  评论:(0)  加入收藏
SpringBoot开发的物联网通信平台系统项目功能模块 功能 说明 MQTT 1.SSL支持 2.集群化部署时暂不支持retain&will类型消 UDP ...【详细内容】
2021-11-05  Tags: SpringBoot  点击:(55)  评论:(0)  加入收藏
1. 介绍1.1 介绍今天开始我们来学习Java操作MySQL数据库的技巧,Java操作MySQL是借助JdbcTemplate这个对象来实现的。JdbcTemplate是一个多数据库集中解决方案,而我们今天只讲...【详细内容】
2021-11-05  Tags: SpringBoot  点击:(30)  评论:(0)  加入收藏
SpringBoot中的Controller注册本篇将会以Servlet为切入点,通过源码来看web容器中的Controller是如何注册到HandlerMapping中。请求来了之后,web容器是如何根据请求路径找到对...【详细内容】
2021-11-04  Tags: SpringBoot  点击:(52)  评论:(0)  加入收藏
环境:Springboot2.4.11环境配置接下来的演示都是基于如下接口进行。@RestController@RequestMapping("/exceptions")public class ExceptionsController { @GetMapping(...【详细内容】
2021-10-11  Tags: SpringBoot  点击:(41)  评论:(0)  加入收藏
SpringBoot项目默认使用logback, 已经内置了 logback 的相关jar包,会从resource包下查找logback.xml, logback 文件格式范本 可直接复制使用,有控制台 info.log error.log三个...【详细内容】
2021-10-09  Tags: SpringBoot  点击:(50)  评论:(0)  加入收藏
环境:Springboot2.4.10当应用程序启动时,Spring Boot将自动从以下位置查找并加载application.properties和application.yaml文件: 从Classpath类路径classpath的根类路径classp...【详细内容】
2021-09-26  Tags: SpringBoot  点击:(76)  评论:(0)  加入收藏
搭建基础1. Intellij IDEA 2. jdk1.8 3. maven3.6.3搭建方式(1)在线创建项目Spring Boot 官方提供的一种创建方式,在浏览器中访问如下网址: https://start.spring.io/在打开的页...【详细内容】
2021-09-14  Tags: SpringBoot  点击:(78)  评论:(0)  加入收藏
最近开发项目的时候需要用到对象的属性拷贝,以前也有用过一些复制框架,比如spring的 BeanUtils.copyProperties等方式,但总是不尽如人意,最近发现使用orika进行对象拷贝挺好用的...【详细内容】
2021-08-27  Tags: SpringBoot  点击:(231)  评论:(0)  加入收藏
▌简易百科推荐
近日只是为了想尽办法为 Flask 实现 Swagger UI 文档功能,基本上要让 Flask 配合 Flasgger, 所以写了篇 Flask 应用集成 Swagger UI 。然而不断的 Google 过程中偶然间发现了...【详细内容】
2021-12-23  Python阿杰    Tags:FastAPI   点击:(6)  评论:(0)  加入收藏
文章目录1、Quartz1.1 引入依赖<dependency> <groupId>org.quartz-scheduler</groupId> <artifactId>quartz</artifactId> <version>2.3.2</version></dependency>...【详细内容】
2021-12-22  java老人头    Tags:框架   点击:(11)  评论:(0)  加入收藏
今天来梳理下 Spring 的整体脉络啦,为后面的文章做个铺垫~后面几篇文章应该会讲讲这些内容啦 Spring AOP 插件 (了好久都忘了 ) 分享下 4ye 在项目中利用 AOP + MybatisPlus 对...【详细内容】
2021-12-07  Java4ye    Tags:Spring   点击:(14)  评论:(0)  加入收藏
&emsp;前面通过入门案例介绍,我们发现在SpringSecurity中如果我们没有使用自定义的登录界面,那么SpringSecurity会给我们提供一个系统登录界面。但真实项目中我们一般都会使用...【详细内容】
2021-12-06  波哥带你学Java    Tags:SpringSecurity   点击:(18)  评论:(0)  加入收藏
React 简介 React 基本使用<div id="test"></div><script type="text/javascript" src="../js/react.development.js"></script><script type="text/javascript" src="../js...【详细内容】
2021-11-30  清闲的帆船先生    Tags:框架   点击:(19)  评论:(0)  加入收藏
流水线(Pipeline)是把一个重复的过程分解为若干个子过程,使每个子过程与其他子过程并行进行的技术。本文主要介绍了诞生于云原生时代的流水线框架 Argo。 什么是流水线?在计算机...【详细内容】
2021-11-30  叼着猫的鱼    Tags:框架   点击:(21)  评论:(0)  加入收藏
TKinterThinter 是标准的python包,你可以在linx,macos,windows上使用它,你不需要安装它,因为它是python自带的扩展包。 它采用TCL的控制接口,你可以非常方便地写出图形界面,如...【详细内容】
2021-11-30    梦回故里归来  Tags:框架   点击:(26)  评论:(0)  加入收藏
前言项目中的配置文件会有密码的存在,例如数据库的密码、邮箱的密码、FTP的密码等。配置的密码以明文的方式暴露,并不是一种安全的方式,特别是大型项目的生产环境中,因为配置文...【详细内容】
2021-11-17  充满元气的java爱好者  博客园  Tags:SpringBoot   点击:(25)  评论:(0)  加入收藏
一、搭建环境1、创建数据库表和表结构create table account(id INT identity(1,1) primary key,name varchar(20),[money] DECIMAL2、创建maven的工程SSM,在pom.xml文件引入...【详细内容】
2021-11-11  AT小白在线中  搜狐号  Tags:开发框架   点击:(29)  评论:(0)  加入收藏
SpringBoot开发的物联网通信平台系统项目功能模块 功能 说明 MQTT 1.SSL支持 2.集群化部署时暂不支持retain&will类型消 UDP ...【详细内容】
2021-11-05  小程序建站    Tags:SpringBoot   点击:(55)  评论:(0)  加入收藏
最新更新
栏目热门
栏目头条