实验目的:
1:在HQ上部署静态地址转换将Server的TCP 80端口 映射到 本设备公网IP地址(192.168.1.2)的 TCP 8888端口。
2:在Branch上部署PAT 使得PC1和PC2都能够访问互联网(能ping通192.168.1.2),Branch设备上不能写静态路由。

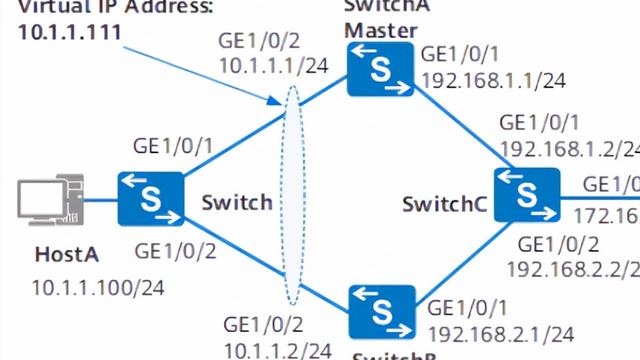
拓扑图
LAB1:
在HQ上部署静态地址转换将Server的TCP 80端口 映射到 本设备公网IP地址(192.168.1.2)的 TCP 8888端口。
PC1的配置(基本配置):
Router>enable //用户模式进入特权模式
Router#configure terminal //特权模式进入全局配置模式
Enter configuration commands, one per line. End with CNTL/Z.
PC1(config)#hostname PC1 //设备命名为PC 1
PC1(config)#no ip routing //关闭路由功能
PC1(config)#ip default-gateway 10.1.10.254 //默认网关为10.1.10.254
PC1(config)#interface ethernet 0/1 //进入接口E0/1
PC1(config-if)#ip address 10.1.10.100 255.255.255.0
//IP地址配置为10.1.10.100/24
PC1(config-if)#no shutdown //开启接口
*Oct 26 23:59:31.864: %LINK-3-UPDOWN: Interface Ethernet0/1, changed state to up
*Oct 26 23:59:32.873: %LINEPROTO-5-UPDOWN: Line protocol on Interface Ethernet0/1, changed state to up
PC1(config-if)#exit //退出接口模式
PC1(config)#
PC2的配置(基本配置):
Router>enable //用户模式进入特权模式
Router#configure terminal //特权模式进入全局配置模式
Enter configuration commands, one per line. End with CNTL/Z.
Router(config)#hostname PC2 //设备命名为PC2
PC2(config)#no ip routing //关闭路由功能
PC2(config)#ip default-gateway 10.1.20.254
//默认网关为10.1.20.254
PC2(config)#interface ethernet 0/1 //进入接口E0/1
PC2(config-if)#ip add 10.1.20.200 255.255.255.0
//接口配置ip地址
PC2(config-if)#no shutdown //开启接口
*Oct 27 00:08:30.621: %LINK-3-UPDOWN: Interface Ethernet0/1, changed state to up
*Oct 27 00:08:31.629: %LINEPROTO-5-UPDOWN: Line protocol on Interface Ethernet0/1, changed state to up
PC2(config-if)#exit //退出到接口模式
PC2(config)#
SW1的配置(基本配置):
Switch>enable //用户模式进入特权模式
Switch#configure terminal //特权模式进入全局配置模式
Enter configuration commands, one per line. End with CNTL/Z.
Switch(config)#hostname SW1 //设备命名为SW1
SW1(config)#vlan 10 //创建vlan10
SW1(config-vlan)#exit
SW1(config)#vlan 20 //创建vlan20
SW1(config-vlan)#exit
SW1(config)#interface ethernet 0/0 //进入接口E0/0
SW1(config-if)#switchport trunk encapsulation dot1q
//接口封装DOT1Q
SW1(config-if)#switchport mode trunk //接口模式为trunk
SW1(config-if)#no shutdown //开启接口
SW1(config-if)#exit
SW1(config)#interface ethernet 0/1 //进入接口E0/1
SW1(config-if)#switchport mode access //接口配置为access
SW1(config-if)#switchport access vlan 10 //接口配置vlan10通过
SW1(config-if)#no shutdown //开启接口
SW1(config-if)#exit
SW1(config)#interface ethernet 0/2 //进入接口E0/2
SW1(config-if)#switchport trunk encapsulation dot1q
//接口封装DOT1Q
SW1(config-if)#switchport mode trunk //接口模式为trunk
SW1(config-if)#no shutdown //开启接口
SW1(config-if)#exit
SW2的配置(基本配置):
Switch>enable //用户模式进入特权模式
Switch#configure terminal //特权模式进入全局配置模式
Enter configuration commands, one per line. End with CNTL/Z.
Switch(config)#hostname SW2 //设备命名为SW2
SW2(config)#vlan 10 //创建vlan10
SW2(config-vlan)#exit
SW2(config)#vlan 20 //创建vlan20
SW2(config-vlan)#exit
SW2(config)#interface ethernet 0/1 //进入接口E0/1
SW2(config-if)#switchport mode access //接口配置为access
SW2(config-if)#switchport access vlan 20 //接口配置vlan20通过
SW2(config-if)#no shut //开启接口
SW2(config-if)#exit
SW2(config)#interface ethernet 0/2 //进入接口E0/2
SW2(config-if)#switchport trunk encapsulation dot1q //接口封装DOT1Q
SW2(config-if)#switchport mode trunk //接口模式为trunk
SW2(config-if)#no shut //开启接口
SW2(config-if)#exit
SW2(config)#
Branch的配置(基本配置):
Router>enable //用户模式进入到特权模式
Router#configure terminal // 特权模式进入到全局配置模式
Enter configuration commands, one per line. End with CNTL/Z.
Router(config)#hostname Branch //设备命名为Branch
Branch(config)#interface e0/1 //进入接口E0/1
Branch(config-if)#ip address 192.168.1.1 255.255.255.0 //接口IP配置
Branch(config-if)#no shutdown //开启接口
Branch(config-if)#
*Oct 27 00:50:10.770: %OSPF-5-ADJCHG: Process 110, Nbr 202.100.1.2 on Ethernet 0/1 from LOADING to FULL, Loading Done
Branch(config-if)#exit //退出接口配置模式
Branch(config)#interface ethernet 0/0 //进入接口E0/0
Branch(config-if)#no shutdown //开启接口
*Oct 27 00:50:37.516: %LINK-3-UPDOWN: Interface Ethernet0/0, changed state to up
*Oct 27 00:50:38.523: %LINEPROTO-5-UPDOWN: Line protocol on Interface Ethernet0/0, changed state to up
Branch(config-if)#interface ethernet 0/0.10 //进入子接口E0/0.10
Branch(config-subif)#encapsulation dot1q 10 //子接口封装dot1q
Branch(config-subif)#ip address 10.1.10.254 255.255.255.0 //子接口配置IP地址
Branch(config-subif)#no shutdown //开启子接口
Branch(config-subif)#interface ethernet 0/0.20 //进入到子接口E0/0.20
Branch(config-subif)#encapsulation dot1q 20 //子接口封装dot1q
Branch(config-subif)#ip address 10.1.20.254 255.255.255.0 //子接口配置IP地址
Branch(config-subif)#no shutdown //开启接口
Branch(config-subif)#
HQ的配置:
Router>enable //用户模式进入到特权模式
Router#configure terminal //特权模式进入到全局配置模式
Enter configuration commands, one per line. End with CNTL/Z.
Router(config)#hostname HQ //设备命名为HQ
HQ(config)#interface ethernet 0/0 //进入到接口E0/0
HQ(config-if)#ip address 172.16.1.1 255.255.255.0 //接口配置IP地址
HQ(config-if)#no shutdown //开启接口
HQ(config-if)# ip ospf 110 area 0 //接口运行ospf协议
*Oct 27 00:44:15.029: %LINK-3-UPDOWN: Interface Ethernet0/0, changed state to up
*Oct 27 00:44:16.034: %LINEPROTO-5-UPDOWN: Line protocol on Interface Ethernet0/0, changed state to up
HQ(config-if)#exit //退出接口模式
HQ(config)#interface e0/1 // 进入接口E0/1
HQ(config-if)#ip address 192.168.1.2 255.255.255.0 // 接口配置IP地址
HQ(config-if)#no shutdown //开启接口
*Oct 27 00:45:10.178: %LINK-3-UPDOWN: Interface Ethernet 0/1, changed state to up
*Oct 27 00:45:11.185: %LINEPROTO-5-UPDOWN: Line protocol on Interface Ethernet 0/1, changed state to up
HQ(config-if)#ip ospf 110 area 0 //接口运行ospf协议
HQ(config-if)#
*Oct 27 00:46:03.504: %OSPF-5-ADJCHG: Process 110, Nbr 172.16.1.2 on Ethernet0/0 from LOADING to FULL, Loading Done
HQ(config-if)#exit //退出接口模式
HQ(config)#
Server的配置:
Router>enable //用户模式进入到特权模式
Router#configure terminal //特权模式进入到全局配置模式
Enter configuration commands, one per line. End with CNTL/Z.
Router(config)#hostname Server // 设备命名为Server
Server(config)#no ip routing //关闭路由功能
Server(config)#ip default-gateway 172.16.1.1 //默认网关配置为172.16.1.1
Server(config)#interface ethernet 0/0 //进入接口E0/0
Server(config-if)#ip address 172.16.1.2 255.255.255.0 //接口配置IP地址
Server(config-if)#no shutdown //开启接口
Server(config-if)#exit //退出接口
*Oct 27 00:35:44.503: %LINK-3-UPDOWN: Interface Ethernet0/0, changed state to up
*Oct 27 00:35:45.511: %LINEPROTO-5-UPDOWN: Line protocol on Interface Ethernet0/0, changed state to up
Server(config)#
各个设备的测试结果:
(Branch设备不开启动态和静态路由,Server设备关闭的路由功能)
Server设备ping HQ设备:

Branch设备ping HQ设备:

设备测试:


HQ设备添加的配置:
HQ(config)#ip nat inside source static tcp 172.16.1.2 80 192.168.1.2 8888 extendable
//静态地址转换配置172.16.1.2的80端口转换为192.168.1.2的8888端口
HQ(config)#interface e0/0 //进入接口E0/0
HQ(config-if)#ip nat inside //定义inside接口
HQ(config-if)# interface e0/1 //进入接口E0/1
HQ(config-if)#ip nat outside //定义outside接口
Server设备配置:
Server(config)#ip http server //开启http server
测试结果:
使用:do show ip nat translations查看nat表


LAB2:
在Branch上部署PAT 使得PC1和PC2都能够访问互联网(能ping通192.168.1.2),Branch设备上不能写静态路由。
未开启PAT 转换时PC1和 PC2的测试:


HQ设备添加的配置:
Branch(config)#ip access-list standard NAT //定义标准的访问控制列表
Branch(config-std-nacl)#permit 10.1.0.0 0.0.255.255 //允许10.1.0.0/16网段的地址
Branch(config-std-nacl)#exit //退出访问控制配置
Branch(config)#ip nat inside source list NAT interface ethernet 0/1 overload //PAT地址转换
Branch(config)#interface e0/0.10 //进入接口E0/0.10
Branch(config-subif)#ip nat inside //配置nat inside
*Oct 27 11:10:10.480: %LINEPROTO-5-UPDOWN: Line protocol on Interface NVI0, changed state to up
Branch(config-subif)#interface e0/0.20 //进入接口E0/0.20
Branch(config-subif)#ip nat inside //配置nat inside
Branch(config-subif)#interface e0/1 //进入接口E0/1
Branch(config-if)#ip nat outside //配置nat outside
Branch(config-if)#
Branch和PC1和PC2测试结果: