作者:子弈
转发链接:https://juejin.im/post/6856410900577026061
目录
从零开始配置 TypeScript 项目的教程(二) 本篇
Jest 确保构建
单独通过执行Unpm run test 命令进行单元测试,这里演示执行构建命令时的单元测试(需要保证构建之前所有的单元测试用例都能通过)。如果测试失败,那么应该防止继续构建,例如进行失败的构建行为:
PS C:CodeGitalgorithms> npm run build

> algorithms-utils@1.0.0 build C:CodeGitalgorithms
> npm run lint-strict && npm run jest && rimraf dist types && gulp


> algorithms-utils@1.0.0 lint-strict C:CodeGitalgorithms
> eslint src --max-warnings 0


> algorithms-utils@1.0.0 jest C:CodeGitalgorithms
> jest --coverage

 PASS  dist/test/greet.spec.js
 FAIL  test/greet.spec.ts
  ● src/greet.ts › name param test

    expect(received).toBe(expected) // Object.is equality

    Expected: "Hello from world 1"
    Received: "Hello from world"

      3 | describe("src/greet.ts", () => {
      4 |   it("name param test", () => {
    > 5 |     expect(greet("world")).toBe("Hello from world 1");
        |                            ^
      6 |   });
      7 | });
      8 |

      at Object.<anonymous> (test/greet.spec.ts:5:28)

----------|---------|----------|---------|---------|-------------------
| File       | % Stmts   | % Branch   | % Funcs   | % Lines   | Uncovered Line #s   |
| ---------- | --------- | ---------- | --------- | --------- | ------------------- |
| All files  | 100       | 100        | 100       | 100       |
| greet.ts   | 100       | 100        | 100       | 100       |
| ---------- | --------- | ---------- | --------- | --------- | ------------------- |
Test Suites: 1 failed, 1 passed, 2 total
Tests:       1 failed, 1 passed, 2 total
Snapshots:   0 total
Time:        3.45 s
Ran all test suites.
npm ERR! code ELIFECYCLE
npm ERR! errno 1
npm ERR! algorithms-utils@1.0.0 jest: `jest --coverage`
npm ERR! Exit status 1
npm ERR!
npm ERR! Failed at the algorithms-utils@1.0.0 jest script.
npm ERR! This is probably not a problem with npm. There is likely additional logging output above.

npm ERR! A complete log of this run can be found in:
npm ERR!     C:Users子弈AppDataRoamingnpm-cache_logs2020-07-12T13_42_11_628Z-debug.log
npm ERR! code ELIFECYCLE
npm ERR! errno 1
npm ERR! algorithms-utils@1.0.0 build: `npm run lint-strict && npm run jest && rimraf dist types && gulp`
npm ERR! Exit status 1
npm ERR!
npm ERR! Failed at the algorithms-utils@1.0.0 build script.
npm ERR! This is probably not a problem with npm. There is likely additional logging output above.

npm ERR! A complete log of this run can be found in:
npm ERR!     C:Users子弈AppDataRoamingnpm-cache_logs2020-07-12T13_42_11_673Z-debug.log
需要注意由于是并行(&&)执行脚本,因此执行构建命令时(npm run build)会先执行 ESLint 校验,如果 ESLint 校验失败那么退出构建,否则继续进行 Jest 单元测试。如果单元测试失败那么退出构建,只有当两者都通过时才会进行源码构建。
Jest 确保代码上传
除了预防不负责任的代码构建以外,还需要预防不负责任的代码提交。配合 lint-staged 可以防止未跑通单元测试的代码进行远程提交:
"scripts": {
  "lint": "eslint src --max-warnings 0",
  "test": "jest --bail --coverage",
},
"lint-staged": {
  "*.ts": [
    "npm run lint",
    "npm run test"
  ]
}
此时如果单元测试有误,都会停止代码提交:
husky > pre-commit (node v12.13.1)
[STARTED] Preparing...
[SUCCESS] Preparing...
[STARTED] Running tasks...
[STARTED] Running tasks for *.ts
[STARTED] npm run lint
[SUCCESS] npm run lint
[STARTED] npm run jest
[FAILED] npm run jest [FAILED]
[FAILED] npm run jest [FAILED]
[SUCCESS] Running tasks...
[STARTED] Applying modifications...
[SKIPPED] Skipped because of errors from tasks.
[STARTED] Reverting to original state because of errors...
[SUCCESS] Reverting to original state because of errors...
[STARTED] Cleaning up...
[SUCCESS] Cleaning up...

× npm run jest:
FAIL test/greet.spec.ts
  src/greet.ts
    × name param test (4 ms)

  ● src/greet.ts › name param test

    expect(received).toBe(expected) // Object.is equality

    Expected: "Hello from world 1"
    Received: "Hello from world"

      3 | describe("src/greet.ts", () => {
      4 |   it("name param test", () => {
    > 5 |     expect(greet("world")).toBe("Hello from world 1");
        |                            ^
      6 |   });
      7 | });
      8 |

      at Object.<anonymous> (test/greet.spec.ts:5:28)

Test Suites: 1 failed, 1 total
Tests:       1 failed, 1 total
Snapshots:   0 total
Time:        1.339 s, estimated 3 s
Ran all test suites related to files matching /C:\Code\Git\algorithms\src\index.ts|C:\Code\Git\algorithms\test\greet.spec.ts/i.
npm ERR! code ELIFECYCLE
npm ERR! errno 1
npm ERR! algorithms-utils@1.0.0 jest: `jest --bail --findRelatedTests --coverage "C:/Code/Git/algorithms/src/index.ts" "C:/Code/Git/algorithms/test/greet.spec.ts"`
npm ERR! Exit status 1
npm ERR!
npm ERR! Failed at the algorithms-utils@1.0.0 jest script.
npm ERR! This is probably not a problem with npm. There is likely additional logging output above.

npm ERR! A complete log of this run can be found in:
npm ERR!     C:Users子弈AppDataRoamingnpm-cache_logs2020-07-12T14_33_51_183Z-debug.log

> algorithms-utils@1.0.0 jest C:CodeGitalgorithms
> jest --bail --findRelatedTests --coverage "C:/Code/Git/algorithms/src/index.ts" "C:/Code/Git/algorithms/test/greet.spec.ts"

----------|---------|----------|---------|---------|-------------------
| File       | % Stmts   | % Branch   | % Funcs   | % Lines   | Uncovered Line #s   |
| ---------- | --------- | ---------- | --------- | --------- | ------------------- |
| All files  | 0         | 0          | 0         | 0         |
| ---------- | --------- | ---------- | --------- | --------- | ------------------- |
husky > pre-commit hook failed (add --no-verify to bypass)
git exited with error code 1
温馨提示:想要了解更多关于 Jest 的生态可以查看 awesome-jest[113]。
Jest 对于 ESLint 支持
src 目录下的源码通过配置 @typescript-eslint/eslint-plugin 可进行推荐规则的 ESLint 校验,为了使得 test 目录下的测试代码能够进行复合 Jest 推荐规则的 ESLint 校验,可以通过配置 eslint-plugin-jest[114] 进行支持(ts-jest 项目就是采用了该插件进行 ESLint 校验,具体可查看配置文件 `ts-jest/.eslintrc.js`[115]),这里仍然采用推荐的规则配置:
module.exports = {
  root: true,
  parser: "@typescript-eslint/parser",
  plugins: ["@typescript-eslint"],
  extends: [
    "eslint:recommended",
    "plugin:@typescript-eslint/recommended",
    // 新增推荐的 ESLint 校验规则
    // 所有规则集查看:https://github.com/jest-community/eslint-plugin-jest#rules(recommended 标识表明是推荐规则)
    "plugin:jest/recommended",
  ],
};
为了验证推荐规则是否生效,这里可以找一个 `no-identical-title`[116] 规则进行验证:
import greet from "@/greet";
describe("src/greet.ts", () => {
  it("name param test", () => {
    expect(greet("world")).toBe("Hello from world 1");
  });
});

// 这里输入了重复的 title
describe("src/greet.ts", () => {
  it("name param test", () => {
    expect(greet("world")).toBe("Hello from world 1");
  });
});
需要注意修改 package.json 中的 ESLint 校验范围:
"scripts": {
  // 这里对 src 和 test 目录进行 ESLint 校验
  "lint": "eslint src test --max-warnings 0",
},
执行 npm run lint 进行单元测试的格式校验:
PS C:CodeGitalgorithms> npm run lint

> algorithms-utils@1.0.0 lint C:CodeGitalgorithms
> eslint src test --max-warnings 0


C:CodeGitalgorithmstestgreet.spec.ts
  9:10  error  Describe block title is used multiple times in the same describe block  jest/no-identical-title

✖ 1 problem (1 error, 0 warnings)

npm ERR! code ELIFECYCLE
npm ERR! errno 1
npm ERR! algorithms-utils@1.0.0 lint: `eslint src test --max-warnings 0`
npm ERR! Exit status 1
npm ERR!
npm ERR! Failed at the algorithms-utils@1.0.0 lint script.
npm ERR! This is probably not a problem with npm. There is likely additional logging output above.

npm ERR! A complete log of this run can be found in:
npm ERR!     C:Users子弈AppDataRoamingnpm-cache_logs2020-07-13T02_25_12_043Z-debug.log
此时会发现 ESLint 抛出了相应的错误信息。需要注意采用此 ESLint 校验之后也会在 VS Code 中实时生成错误提示(相应的代码下会有红色波浪线,鼠标移入后会产生 Tooltip 提示该错误的相应规则信息,除此之外当前工程目录下对应的文件名也会变成红色),此后的 Git 提交以及 Build 构建都会失败!
温馨提示:如果你希望 Jest 测试的代码需要一些格式规范,那么可以查看 eslint-plugin-jest-formatting[117] 插件。
Npm Script Hook
当你查看前端开源项目时第一时间可能会找 package.json 中的 main、bin 以及files 等字段信息,除此之外如果还想深入了解项目的结构,可能还会查看scripts 脚本字段信息用于了解项目的开发、构建、测试以及安装等流程。npm 的脚本功能非常强大,你可以利用脚本制作项目需要的任何流程工具。本文不会过多介绍 npm 脚本的功能,只是讲解一下其中用到的 钩子[118] 功能。
目前在本项目中使用的一些脚本命令如下(就目前而言脚本相对较少,定义还蛮清晰的):
"lint": "eslint src test --max-warnings 0",
"test": "jest --bail --coverage",
"build": "npm run lint && npm run prettier && npm run test && rimraf dist types && gulp",
"changelog": "rimraf CHANGELOG.md && conventional-changelog -p angular -i CHANGELOG.md -s"
重点看下 build 脚本命令,会发现这个脚本命令包含了大量的继发执行脚本,但真正和 build 相关的只有 rimraf dist types && gulp 这两个脚本。这里通过 npm 的脚本钩子 pre 和 post 将脚本的功能区分开,从而使脚本的语义更加清晰(当然脚本越来越多的时候也可能容易增加开发者的认知负担)。npm 除了指定一些特殊的脚本钩子以外(例如prepublish、postpublish、preinstall、postinstall等),还可以对任意脚本增加 pre 和 post 钩子,这里通过自定义钩子将并发执行的脚本进行简化:
"lint": "eslint src test --max-warnings 0",
"test": "jest --bail --coverage",
"prebuild": "npm run lint && npm run prettier && npm run test",
"build": "rimraf dist types && gulp",
"changelog": "rimraf CHANGELOG.md && conventional-changelog -p angular -i CHANGELOG.md -s"
此时如果执行 npm run build 命令时事实上类似于执行了以下命令:
npm run prebuild && npm run build
之后设计的脚本如果继发执行繁多,那么都会采用 npm scripts hook 进行设计。
温馨提示:大家可能会奇怪什么地方需要类似于 preinstall 或 preuninstall 这样的钩子,例如查看 husky - package.json[119],husky 在安装的时候因为要植入 Git Hook 脚本从而带来了一些副作用(此时当然可以通过 preinstall触发 Git Hook 脚本植入的逻辑)。如果不想使用 husky,那么卸载后需要清除植入的脚本从而不妨碍原有的 Git Hook 功能。当然如果想要了解更多关于 npm 脚本的信息,可以查看 npm-scripts[120] 或 npm scripts 使用指南[121]。
Vuepress
Vuepress 背景
一般组件库或工具库都需要设计一个演示文档(提供良好的开发体验)。一般的工具库可以采用 tsdoc[122]、jsdoc[123] 或 esdoc[124] 等工具进行 API 文档的自动生成,但往往需要符合一些注释规范,这些注释规范在某种程度上可能会带来开发负担,当然也可以交给 VS Code 的插件进行一键生成,例如 Document This For jsdoc[125] 或 TSDoc Comment[126]。
组件库 Element UI 采用 vue-markdown-loader[127](Convert Markdown file to Vue Component using markdown-it) 进行组件的 Demo 演示设计,但是配置相对复杂。更简单的方式是配合 Vuepress[128] 进行设计,它的功能非常强大,但前提是熟悉 Vue,因为可以在 Markdown 中使用 Vue 语法。当然如果是 React 组件库的 Demo 演示,则可以采用 dumi[129] 生成组件 Demo 演示文档(不知道没有更加好用的类 Vuepress 的 React 组件文档生成器, 更多和 React 文档相关也可以了解 react-markdown[130]、react-static[131] 等)。
由于之前采用过 Vuepress 设计 Vue 组件库的 Demo 演示文档,因此这里仍然沿用它来设计工具库包的 API 文档(如果你想自动生成 API 文档,也可以额外配合 tsdoc 工具)。采用 Vuepress 设计文档的主要特点如下:
- 可以在 Markdown 中直接使用 Vue(还可以自定义 Vue 文档视图组件)
- 内置了很多 Markdown 拓展
- 可以使用 Webpack 进行构建定制化配置
- 默认主题支持搜索能力
- 可以安装 Vuepress 插件(后续需要支持的 Latex[132] 排版就可以利用现有的插件能力生成)
- 默认响应式
Vuepress 配置
先按照官方的 快速上手[133] 文档进行依赖安装和 npm scripts 脚本设置:
"scripts": {
  "docs:dev": "vuepress dev docs",
  "docs:build": "vuepress build docs"
}
按照 Vuepress 官网约定优于配置的原则进行演示文档的目录结构[134]设计,官方的文档可能一下子难以理解,可以先设计一个最简单的目录:
.
├── docs
│   ├── .vuepress
│   │   └── config.js       # 配置文件
│   └── README.md           # 文档首页
└── package.json
根据默认主题 / 首页[135]在 docs/README.md 进行首页设计:
---
home: true
# heroImage: /hero.png
heroText: algorithms-utils
tagline: 算法与 TypeScript 实现
actionText: 开始学习
actionLink: /guide/
features:
  - title: 精简理论
    details: 精简《算法导论》的内容,帮助自己更容易学习算法理论知识。
  - title: 习题练习
    details: 解答《算法导论》的习题,帮助自己更好的实践算法理论知识。
  - title: 面题精选
    details: 搜集常见的面试题目,提升自己的算法编程能力以及面试通过率。
footer: MIT Licensed | Copyright © 2020-present 子弈
---
根据配置[136] 对 docs/.vuepress/config.js 文件进行基本配置:
const packageJson = require("../../package.json");

module.exports = {
  // 配置网站标题
  title: packageJson.name,
  // 配置网站描述
  description: packageJson.description,
  // 配置基本路径
  base: "/algorithms/",
  // 配置基本端口
  port: "8080",
};
此时通过 npm run docs:dev 进行开发态文档预览:
PS C:CodeGitalgorithms> npm run docs:dev

> algorithms-utils@1.0.0 docs:dev C:CodeGitalgorithms
> vuepress dev docs

wait Extracting site metadata...
tip Apply theme @vuepress/theme-default ...
tip Apply plugin container (i.e. "vuepress-plugin-container") ...
tip Apply plugin @vuepress/register-components (i.e. "@vuepress/plugin-register-components") ...
tip Apply plugin @vuepress/active-header-links (i.e. "@vuepress/plugin-active-header-links") ...
tip Apply plugin @vuepress/search (i.e. "@vuepress/plugin-search") ...
tip Apply plugin @vuepress/nprogress (i.e. "@vuepress/plugin-nprogress") ...

√ Client
  Compiled successfully in 5.31s

i 「wds」: Project is running at http://0.0.0.0:8080/
i 「wds」: webpack output is served from /algorithms-utils/
i 「wds」: Content not from webpack is served from C:CodeGitalgorithmsdocs.vuepresspublic
i 「wds」: 404s will fallback to /index.html
success [23:13:14] Build 10b15a finished in 5311 ms!
> VuePress dev server listening at http://localhost:8080/algorithms-utils/
效果如下:
当然除了以上设计的首页,在本项目中还会设计导航栏[137]、侧边栏[138]、使用插件[139]、使用组件[140]等。这里重点讲解一下 Webpack 构建[141] 配置。
为了在 Markdown 文档中可以使用 src 目录的 TypeScript 代码,这里对 .vuepress/config.js 文件进行配置处理:
const packageJson = require("../../package.json");
const sidebar = require("./config/sidebar.js");
const nav = require("./config/nav.js");
const path = require("path");

module.exports = {
  title: packageJson.name,
  description: packageJson.description,
  base: "/algorithms/",
  port: "8080",

  themeConfig: {
    nav,
    sidebar,
  },

  plugins: [
    "vuepress-plugin-cat",
    [
      "mathjax",
      {
        target: "svg",
        macros: {
          "*": "\times",
        },
      },
    ],
    // 增加 Markdown 文档对于 TypeScript 语法的支持
    [
      "vuepress-plugin-typescript",
      {
        tsLoaderOptions: {
          // ts-loader 的所有配置项
        },
      },
    ],
  ],

  chainWebpack: (config) => {
    config.resolve.alias.set("image", path.resolve(__dirname, "public"));

    // 在文档中模拟库包的引入方式
    // 例如发布了 algorithms-utils 库包之后,
    // import greet from 'algorithms-utils/greet.ts' 在 Vuepress 演示文档中等同于
    // import greet from '~/src/greet.ts',
    // 其中 ~ 在这里只是表示项目根目录
    config.resolve.alias.set(
      "algorithms-utils",
      path.resolve(__dirname, "../../src")
    );
  },
};
温馨提示:这里的 Webpack 配置采用了 webpack-chain[142] 链式操作,如果想要采用 Webpack 对象的配置方式则可以查看 Vuepress - 构建流程 - configurewebpack[143]。
此时可以在 Vuepress 的 Markdown 文档中进行 TypeScript 引入的演示文档设计:
# Test vuepress

::: danger 测试 Vuepress
引入 greet.ts 并进行调用测试。
:::

<template>
  <collapse title="查看答案">{{msg}}</collapse>
</template>

<template>
  <div>{{msg}}</div>
</template>

<script lang="ts">
  import greet from 'algorithms-utils/greet'
  const msg = greet('ziyi')
  export default {
    data() {
      return {
         msg
      }
    },
  }
</script>
启动 Vuepress 查看演示文档:
可以发现在 Markdown 中引入的 src/greet.ts 代码生效了,最终通过 npm run docs:build 可以生成演示文档的静态资源进行部署和访问。
温馨提示:更多本项目的 Vuepress 配置信息可查看 Commit 信息,除此之外如果还想知道更多 Vuepress 的生态,例如有哪些有趣插件或主题,可查看 awesome-vuepress[144] 或 Vuepress 社区[145]。
文档工具和规范
通常在书写文档的时候很多同学都不注重文档的洁癖,其实书写文档和书写代码一样需要一些格式规范。markdownlint[146] 是类似于 ESLint 的 Markdown 格式校验工具,通过它可以更好的规范我们书写的文档。当然 Markdown 的格式校验不需要像 ESLint 或者 Prettier 校验那样进行强约束,简单的能够做到提示和 Save Auto Fix 即可。
通过安装 Vs Code 插件 markdownlint[147] 并进行 Save Auto Fix 配置(在插件中明确列出了哪些规则是可以被 Fix 的)。安装完成后查看刚刚进行的测试文件:
此时会发现插件生效了,但是在 Markdown 中插入 html 是必须的一个能力(Vuepress 支持的能力就是在 Markdown 中使用 Vue),因此可以通过 .markdownlintrc 文件将相应的规则屏蔽掉。
温馨提示:如果你希望在代码提交之前或文档构建之前能够进行 Markdown 格式校验,则可以尝试它的命令行接口 markdownlint-cli[148]。除此之外,如果对文档的设计没有想法或者不清楚如何书写好的技术文档,可以查看 技术文章的写作技巧分享[149],一定能让你有所收获。
Github Actions
CI / CD 背景
前提提示:个人对于 CI / CD 可能相对不够熟悉,只是简单的玩过 Travis、Gitlab CI / CD 以及 Jenkins。
关于 CI / CD 的背景这里就不再过多介绍,有兴趣的同学可以看看以下一些好文:
- Introduction to CI/CD with GitLab(中文版)[150]
- GitHub Actions 入门教程[151]
- Github Actions 官方文档[152]
- 当我有服务器时我做了什么 · 个人服务器运维指南[153](这个系列有点佩服啊)
在 Introduction to CI/CD with GitLab(中文版)[154] 中你可以清晰的了解到 CI 和 CD 的职责功能:
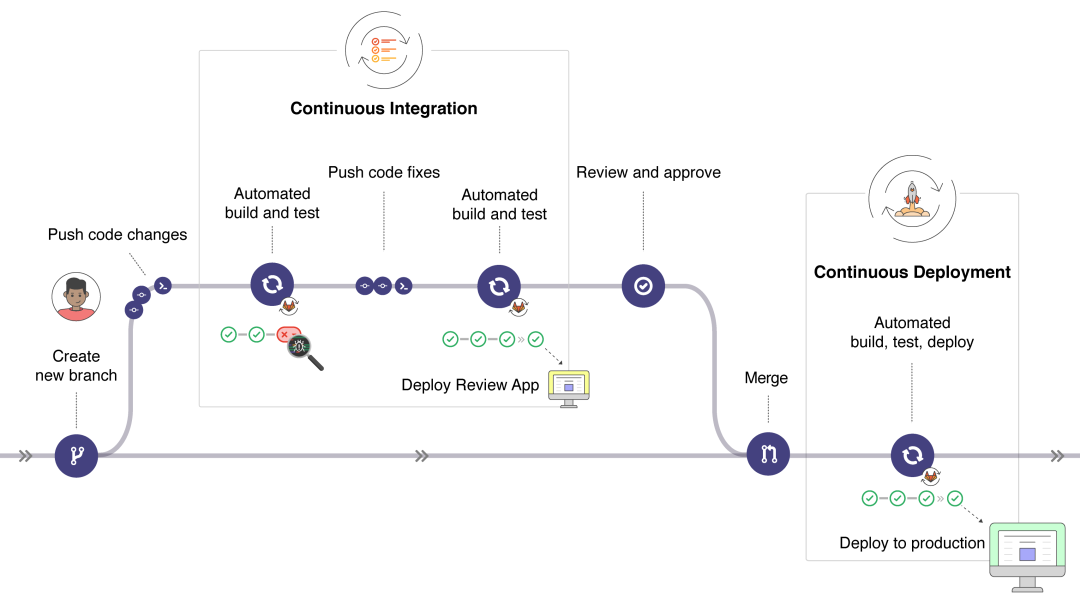
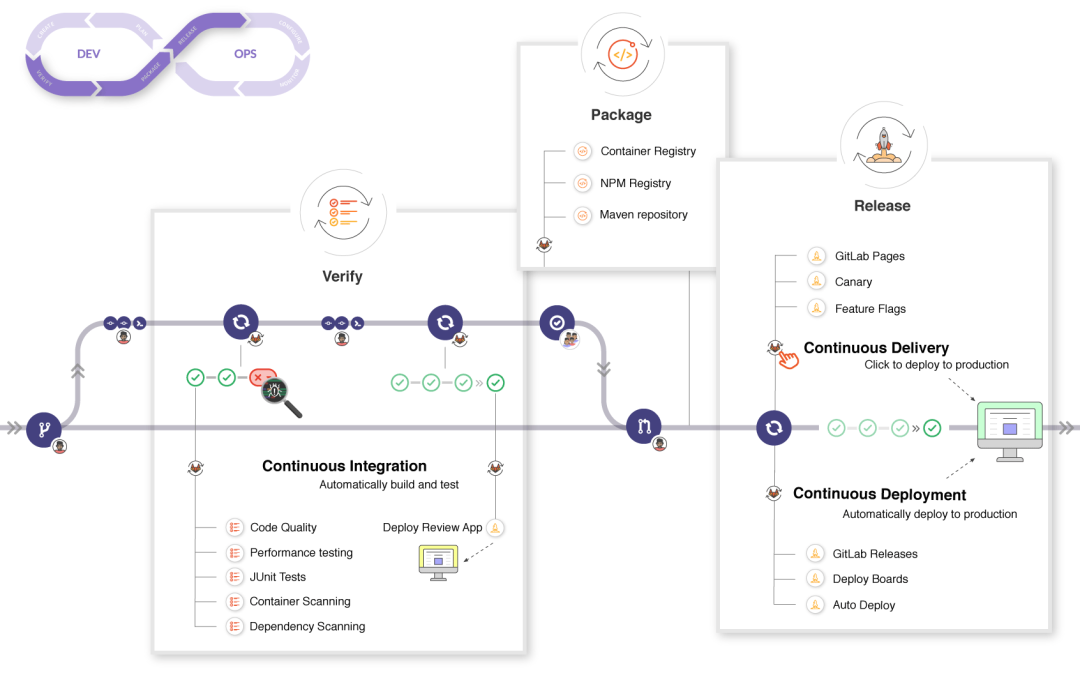
通过以下图可以更清晰的发现 Gitlab 在每个阶段可用的功能:
由于本项目依赖 Github,因此没法使用 Gitlab 默认集成的能力。之前的 Github 项目采用了 Travis 进行项目的 CI / CD 集成,现在因为有了更方便的 Github Actions,因此决定采用 Github 自带的 Actions 进行 CI / CD 能力集成(大家如果想更多了解这些 CI / CD 的差异请自行 google 哈)。Github Actions 所带来的好处在于:
- 可复用的 Actions(以前你需要写复杂的脚本,现在可以复用别人写好的脚本,可以简单理解为 CI 脚本插件化)
- 支持更多的 webhook[155],这些当然是 Github 生态特有的竞争力
当然也会产生一些限制[156],这些限制主要是和执行时间以及次数相关。需要注意类似于 Jenkins 等支持本地连接运行,Github Actions 也支持连接到本地机器运行 workflow,因此部分限制可能不受本地运行的限制。
温馨提示:本项目中使用到的 CI / CD 功能相对简单,如果想了解更多通用的 Actions,可查看 官方 Actions[157] 和 awesome-actions[158]。最近在使用 Jenkins 做前端的自动化构建优化,后续可能会出一篇简单的教程文章(当然会跟普通讲解的用法会有所不同喽)。
Github Actions 配置
本项目的配置可能会包含以下三个方面:
- 自动更新静态资源流程
- 发布库包流程
- 提交 Pull Request 流程
这里主要讲解自动更新静态资源流程,大致需要分为以下几个步骤(以下都是在 Github 服务器上进行操作,你可以理解为新的服务环境):
- 拉取当前 Github 仓库代码并切换到相应的分支
- 安装 Node 和 Npm 环境
- 安装项目的依赖
- 构建库包和演示文档的静态资源
- 发布演示文档的静态资源
通过查看 官方 Actions[159] 和 awesome-actions[160],找到所需的 Actions:
- Checkout[161]: 从 Github 拉取仓库代码到 Github 服务器的 $GITHUB_WORKSPACE目录下
- cache[162]: 缓存 npm
- setup-node[163]: 安装 Node 和 Npm 环境
- actions-gh-pages[164]: 在 Github 上发布静态资源
温馨提示:可用的 Action 很多,这里只是设置了一个简单的流程。
在 .github/workflows 下新增 mian.yml 配置文件:
# 以下都是官方文档的简单翻译
# 当前的 yml(.yaml) 文件是一个 workflow,是持续集成一次运行的一个过程,必须放置在项目的 .github/workflow 目录下
# 如果不清楚 .yml 文件格式语法,可以查看 https://www.codeproject.com/Articles/1214409/Learn-YAML-in-five-minutes
# 初次编写难免会产生格式问题,可以使用 VS Code 插件进行格式检测,https://marketplace.visualstudio.com/items?itemName=OmarTawfik.github-actions-vscode

# 具体各个配置属性可查看 https: //docs.github.com/en/actions/reference/workflow-syntax-for-github-actions

# workflow 的执行仍然会受到一些限制,例如
#  - 每个 job 最多执行 6 小时(本地机器不受限制)
#  - 每个 workflow 最多执行 72 小时
#  - 并发 job 的数量会受到限制
#  - 更多查看 https: //docs.github.com/en/actions/reference/workflow-syntax-for-github-actions#usage-limits

# name: 当前 workflow 的名称
name: Algorithms

# on:  指定 workflow 触发的 event
#
#      event 有以下几种类型
#         - webhook
#         - scheduled
#         - manual
on:
  # push: 一个 webhook event,用于提交代码时触发 workflow,也可以是触发列表,例如 [push, pull_request]

  #        workflows 触发的 event 大部分是基于 webhook 配置,以下列举几个常见的 webhook:
  #           - delete:  删除一个 branch 或 tag 时触发
  #           - fork / watch:  某人 fork / watch 项目时触发(你问有什么用,发送邮件通知不香吗?)
  #           - pull_request:  提交 PR 时触发
  #           - page_build:  提交 Github Pages-enabled 分支代码时触发
  #           - push:  提交代码到特定分支时触发
  #           - registry_package:  发布或跟新 package 时触发
  #           更多 webhook 可查看 https: //docs.github.com/en/actions/reference/events-that-trigger-workflows
  #           从这里可以看出 Git Actions 的一大特点就是 Gihub 官方提供的一系列 webhook
  push:
    # branches: 指定 push 触发的特定分支,这里你可以通过列表的形式指定多个分支
    branches:
      - feat/framework
    #
    # branches 的指定可以是通配符类型,例如以下配置可以匹配 refs/heads/releases/10
    # - 'releases/**'
    #
    # branches 也可以使用反向匹配,例如以下不会匹配 refs/heads/releases/10
    # - '!releases/**'
    #
    # branches-ignore:  只对 [push, pull_request] 两个 webhook 起作用,用于指定当前 webhook 不触发的分支
    # 需要注意在同一个 webhook 中不能和 branches 同时使用
    #
    # tags:  只对 [push, pull_request] 两个 webhook 起作用,用于指定当前 webhook 触发的 tag
    #
    # tags:
    #   - v1             # Push events to v1 tag
    #   - v1.*           # Push events to v1.0, v1.1, and v1.9 tags
    #
    # tags-ignore:  类似于 branches-ignore
    #
    # paths、paths-ignore...
    #
    # 更多关于特定过滤模式可查看 https://docs.github.com/en/actions/reference/workflow-syntax-for-github-actions#filter-pattern-cheat-sheet
    #
    # 其他的 webhook 控制项还包括 types(不是所有的 webhook 都有 types),例如已 issues 为例,可以在 issues 被 open、reopened、closed 等情况下触发 workflow
    # 更多 webhook 的 types 可查看 https: //docs.github.com/en/actions/reference/events-that-trigger-workflows#webhook-events
    #
    # on:
    #   issues:
    #     types:  [opened, edited, closed]

  # 除此之外如果对于每个分支有不同的 webhook 触发,则可以通过以下形式进行多个 webhook 配置
  #
  # push:
  #   branches:
  #     - master
  # pull_request:
  #   branches:
  #     - dev
  #
  # 除了以上所说的 webhook event,还有 scheduled event 和 manual event
  # scheduled event:  用于定时构建,例如最小的时间间隔是 5 min 构建一次
  # 具体可查看 https: //docs.github.com/en/actions/reference/events-that-trigger-workflows#scheduled-events

# env:  指定环境变量(所有的 job 生效,每一个 job 可以独立通过 jobs.<job_id>.env、jobs.<job_id>.steps.env 配置)
# defaults / defaults.run: 所有的 job 生效,每一个 job 可以独立通过 jobs.<job_id>.defaults 配置
# deafults
# defaults.run

# jobs: 一个 workflow 由一个或多个 job 组成
jobs:
  # job id: 是 job 的唯一标识,可以通过 _ 进行连接,例如:  my_first_job,例如这里的 build 就是一个 job id
  build_and_deploy:
    # name: 在 Github 中显示的 job 名称
    name: Build And Deploy
    #
    # needs: 用于继发执行 job,例如当前 job build 必须在 job1 和 job2 都执行成功的基础上执行
    # needs: [job1, job2]
    #
    # runs-on: job 运行的环境配置,包括:
    #   - windows-latest
    #   - windows-2019
    #   - ubuntu-20.04
    #   - ubuntu-latest
    #   - ubuntu-18.04
    #   - ubuntu-16.04
    #   - macos-latest
    #   - macos-10.15
    #   - self-hosted(本地机器,具体可查看 https: //docs.github.com/en/actions/hosting-your-own-runners/using-self-hosted-runners-in-a-workflow)
    runs-on: ubuntu-latest
    #
    # outputs:  用于输出信息
    #
    # env:  用于设置环境变量
    #
    # defaults:  当前所有 step 的默认配置
    #
    # defaults.run

    # if: 满足条件执行当前 job

    # steps:  一个 job 由多个 step 组成,step 可以
    #   - 执行一系列 tasks
    #   - 执行命令
    #   - 执行 action
    #   - 执行公共的 repository
    #   - 在 Docker registry 中的 action
    steps:
      #
      # id: 类似于 job id
      #
      # if:  类似于 job if
      #
      # name:  当前 step 的名字
      - name: Checkout
        #
        # uses: 用于执行 action
        #
        #       action: 可以重复使用的单元代码
        #          - 为了 workflow 的安全和稳定建议指定 action 的发布版本或 commit SHA
        #          - 使用指定 action 的 major 版本,这样可以允许你接收 fixs 以及 安全补丁并同时保持兼容性
        #          - 尽量不建议使用 master 版本,因为 master 很有可能会被发布新的 major 版本从而破坏了 action 的兼容性
        #          - action 可能是 JAVAScript 文件或 Docker 容器,如果是 Docker 容器,那么 runs-on 必须指定 linux 环境
        #
        #         指定固定 commit SHA
        #         uses:  actions/setup-node@74bc508
        #         指定一个 major 发布版本
        #         uses:  actions/setup-node@v1
        #         指定一个 minor 发布版本
        #         uses:  actions/setup-node@v1.2
        #         指定一个分支
        #         uses:  actions/setup-node@master
        #         指定一个 Github 仓库子目录的特定分支、ref 或 SHA
        #         uses:  actions/aws/ec2@master
        #         指定当前仓库所在 workflows 的目录地址
        #         uses:  ./.github/actions/my-action
        #         指定在 Dock Hub 发布的 Docker 镜像地址
        #         uses:  docker: //alpine: 3.8
        #         A Docker image in a public registry
        #         uses:  docker: //gcr.io/cloud-builders/gradle

        # checkout action 主要用于向 github 仓库拉取源代码(需要注意 workflow 是运行在服务器上,因此需要向当前 github 拉取仓库源代码)
        # 它的功能包括但不限于
        #   - Fetch all history for all tags and branches
        #   - Checkout a different branch
        #   - Checkout HEAD^
        #   - Checkout multiple repos (side by side)
        #   - Checkout multiple repos (nested)
        #   - Checkout multiple repos (private)
        #   - Checkout pull request HEAD commit instead of merge commit
        #   - Checkout pull request on closed event
        #   - Push a commit using the built-in token

        # checkout action:  https: //github.com/actions/checkout
        uses: actions/checkout@v2
        # with: action 提供的输入参数
        with:
          # 指定 checkout 的分支、tag 或 SHA
          # 更多 checkout action 的配置可查看 https: //github.com/actions/checkout#usage
          ref: feat/ci
        # args: 用于 Docker 容器的 CMD 指令参数
        # entrypoint: Docker 容器 action(覆盖 Dockerfile 的 ENTRYPOINT) 和 JavaScript action 都可以使用
      #
      # run: 使用当前的操作系统的默认的 non-login shell 执行命令行程序
      # 运行单个脚本
      # run: npm install
      # 运行多个脚本
      # run: |
      #   npm ci
      #   npm run build
      #
      # working-directory: 用于指定当前脚本运行的目录
      # working-directory: ./temp
      #
      # shell: 可以指定 shell 类型进行执行,例如 bash、pwsh、Python、sh、cmd、powershell
      # shell: bash
      #
      # env: 除了可以设置 workflow 以及 job 的 env,也可以设置 step 的 env(可以理解为作用域不同,局部作用域的优先级更高)
      #
      # comtinue-on-error: 默认当前 step 失败则会阻止当前 job 继续执行,设置 true 时当前 step 失败则可以跳过当前 job 的执行

      - name: Cache
        # cache action: https://github.com/actions/cache
        # cache 在这里主要用于缓存 npm,提升构建速率
        uses: actions/cache@v2
        # npm 缓存的路径可查看 https://docs.npmjs.com/cli/cache#cache
        # 由于这里 runs-on 是 ubuntu-latest,因此配置 ~/.npm
        with:
          path: ~/.npm
          key: ${{ runner.os }}-node-${{ hashFiles('**/package-lock.json') }}
          restore-keys: |
            ${{ runner.os }}-node-
      # github-script action: https://github.com/actions/github-script
      # 在 workflow 中使用 Script 语法调用 Github API 或引用 workflow context

      # setup-node action: https://github.com/actions/setup-node
      # 配置 Node 执行环境(当前构建的服务器默认没有 Node 环境,可以通过 Action 安装 Node)
      # 需要注意安装 Node 的同时会捆绑安装 npm,如果想了解为什么会捆绑,可以 Google 一下有趣的故事哦
      # 因此使用了该 action 后就可以使用 npm 的脚本在服务器进行执行啦
      # 这里也可以尝试 v2-beta 版本哦
      - name: Set Node
        uses: actions/setup-node@v1
        with:
          # 也可以通过 strategy.matrix.node 进行灵活配置
          # 这里本地使用 node 的 12 版本构建,因此这里就进行版本固定啦
          node-version: "12"

      - run: npm install
      - run: npm run build
      - run: npm run docs:build

      - name: Deploy
        # 用于发布静态站点资源
        # actions-gh-pages action: https://github.com/peaceiris/actions-gh-pages
        uses: peaceiris/actions-gh-pages@v3
        with:
          # GTIHUB_TOKEN:https://docs.github.com/en/actions/configuring-and-managing-workflows/authenticating-with-the-github_token
          # Github 会在 workflow 中自动生成 GIHUBT_TOKEN,用于认证 workflow 的运行
          github_token: ${{ secrets.GITHUB_TOKEN }}
          # 静态资源目录设置
          publish_dir: ./docs/.vuepress/dist
          # 默认发布到 gh-pages 分支上,可以指定特定的发布分支
          publish_branch: gh-pages1 # default: gh-pages
          full_commit_message: ${{ github.event.head_commit.message }}
    #
    # timeout-minutes: 一个 job 执行的最大时间,默认是 6h,如果超过时间则取消执行
    #
    # strategy.matrix: 例如指定当前 job 的 node 版本列表、操作系统类型列表等
    # strategy.fail-fast
    # strategy.max-parallel
    # continue-on-error:  一旦当前 job 执行失败,那么 workflow 停止执行。设置为 true 可以跳过当前 job 执行
    # container: Docker 容器配置,包括 image、env、ports、volumes、options 等配置
    #
    # services: 使用 Docker 容器 Action 或者 服务 Action 必须使用 Linux 环境运行
温馨提示:这里不再叙述具体的配置过程,更多可查看配置文件中贴出的链接信息。
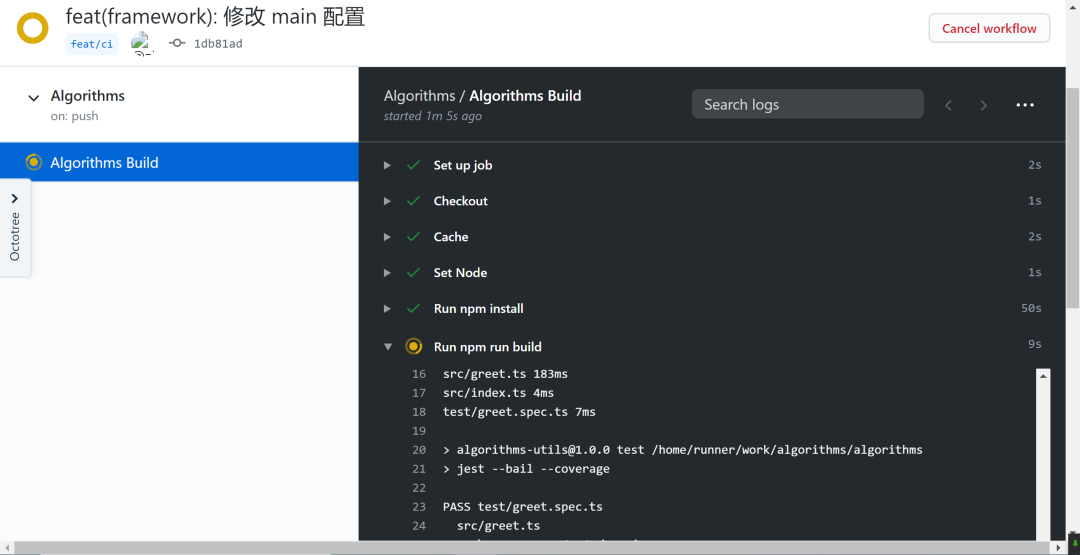
上传 CI 的配置文件后,Github 就会进行自动构建,具体如下:
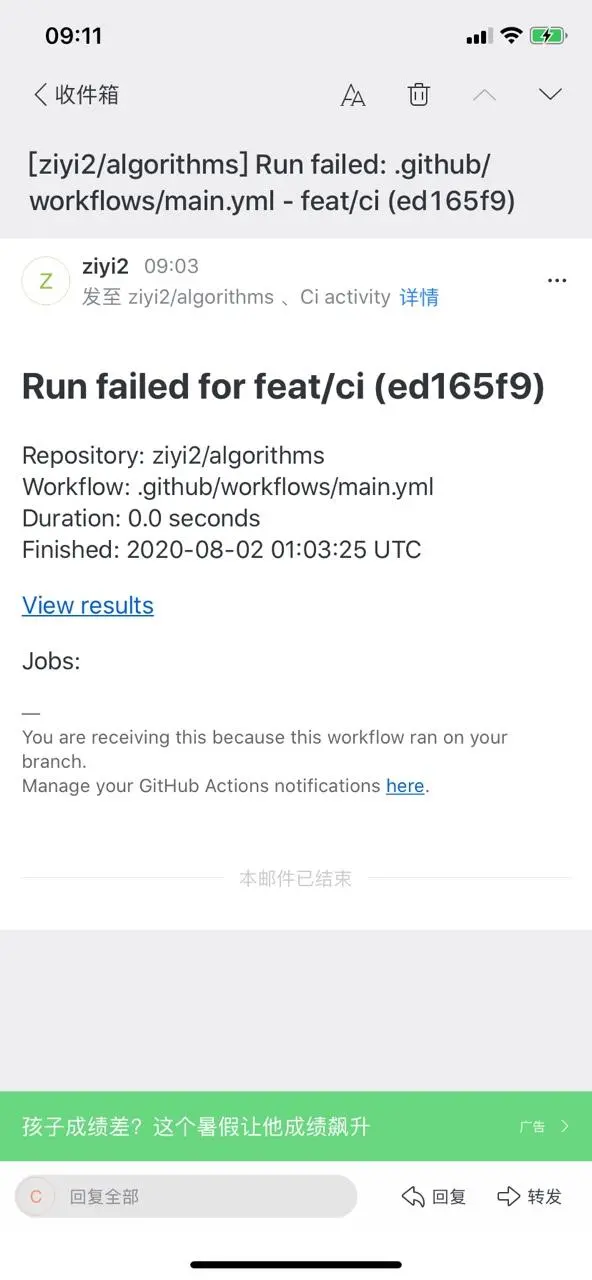
正在构建或者构建完成后可查看每个构建的信息,如果初次构建失败则可以通过构建信息找出失败原因,并重新修改构建配置尝试再次构建。除此之外,每次构建失败 Github 都会通过邮件的形式进行通知:
如果构建成功,则每次你推送新的代码后,Github 服务会进行一系列流程并自动更新静态资源站点。
总结
希望大家看完这篇文档之后如果想使用其中某些工具能够养成以下一些习惯:
- 通篇阅读工具的文档,了解相同功能的不同工具的差异点
通篇阅读工具对应的官方 Github README 文档以及官方站点文档,了解该工具设计的核心哲学、核心功能、解决什么核心问题。前端的工具百花齐放,同样的功能可能可以采用多种不同的工具实现。如果想要在项目中使用适当的工具,就得知道这些工具的差异。完整的阅读相应的官方文档,有助于你理解各自的核心功能和差异。
- 在调研了各个工具的差异之后,选择认为合适的工具进行实践
在实践的过程中你会对该工具的使用越来越熟悉。此时如果遇到一些问题或者想要实现某些功能,在通篇阅读文档的基础上会变得相对容易。当然如果遇到一些报错信息无法解决,此时第一时间应该是搜索当前工具所对应的 Github Issues。除此之外,你也可以根据错误的堆栈信息追踪工具的源码,了解源码之后可能会对错误信息产生的原因更加清晰。
- 在完成以上两步之后,你应该总结工具的使用技巧啦,此时在此通读工具文档可能会产生不一样的收获