通过我之前的Tomcat系列文章,相信看我博客的同学对Tomcat应该有一个比较清晰的了解了,在前几篇博客我们讨论了Tomcat在SpringBoot框架中是如何启动的,讨论了Tomcat的内部组件是如何设计以及请求是如何流转的,那么我们这篇博客聊聊Tomcat的异步Servlet,Tomcat是如何实现异步Servlet的以及异步Servlet的使用场景。
我们直接借助SpringBoot框架来实现一个Servlet,这里只展示Servlet代码:
@WebServlet(urlPatterns = "/async",asyncSupported = true)
@Slf4j
public class AsyncServlet extends HttpServlet {
 ExecutorService executorService =Executors.newSingleThreadExecutor();
 @Override
 protected void doGet(HttpServletRequest req, HttpServletResponse resp) throws ServletException, IOException {
 //开启异步,获取异步上下文
 final AsyncContext ctx = req.startAsync();
 // 提交线程池异步执行
 executorService.execute(new Runnable() {
 @Override
 public void run() {
 try {
 log.info("async Service 准备执行了");
 //模拟耗时任务
 Thread.sleep(10000L);
 ctx.getResponse().getWriter().print("async servlet");
 log.info("async Service 执行了");
 } catch (IOException e) {
 e.printStackTrace();
 } catch (InterruptedException e) {
 e.printStackTrace();
 }
 //最后执行完成后完成回调。
 ctx.complete();
 }
 });
 }
上面的代码实现了一个异步的Servlet,实现了doGet方法注意在SpringBoot中使用需要再启动类加上@ServletComponentScan注解来扫描Servlet。既然代码写好了,我们来看看实际运行效果。

我们发送一个请求后,看到页面有响应,同时,看到请求时间花费了10.05s,那么我们这个Servlet算是能正常运行啦。有同学肯定会问,这不是异步servlet吗?你的响应时间并没有加快,有什么用呢?对,我们的响应时间并不能加快,还是会取决于我们的业务逻辑,但是我们的异步servlet请求后,依赖于业务的异步执行,我们可以立即返回,也就是说,Tomcat的线程可以立即回收,默认情况下,Tomcat的核心线程是10,最大线程数是200,我们能及时回收线程,也就意味着我们能处理更多的请求,能够增加我们的吞吐量,这也是异步Servlet的主要作用。
了解完异步Servlet的作用后,我们来看看,Tomcat是如何是先异步Servlet的。其实上面的代码,主要核心逻辑就两部分,final AsyncContext ctx = req.startAsync()和 ctx.complete()那我们来看看他们究竟做了什么?
 public AsyncContext startAsync(ServletRequest request,
 ServletResponse response) {
 if (!isAsyncSupported()) {
 IllegalStateException ise =
 new IllegalStateException(sm.getString("request.asyncNotSupported"));
 log.warn(sm.getString("coyoteRequest.noAsync",
 StringUtils.join(getNonAsyncClassNames())), ise);
 throw ise;
 }
 if (asyncContext == null) {
 asyncContext = new AsyncContextImpl(this);
 }
 asyncContext.setStarted(getContext(), request, response,
 request==getRequest() && response==getResponse().getResponse());
 asyncContext.setTimeout(getConnector().getAsyncTimeout());
 return asyncContext;
 }
我们发现req.startAsync()只是保存了一个异步上下文,同时设置一些基础信息,比如Timeout,顺便提一下,这里设置的默认超时时间是30S,如果你的异步处理逻辑超过30S,此时执行ctx.complete()就会抛出IllegalStateException 异常。
我们来看看ctx.complete()的逻辑
 public void complete() {
 if (log.isDebugEnabled()) {
 logDebug("complete ");
 }
 check();
 request.getCoyoteRequest().action(ActionCode.ASYNC_COMPLETE, null);
 }
//类:AbstractProcessor
 public final void action(ActionCode actionCode, Object param) {
 case ASYNC_COMPLETE: {
 clearDispatches();
 if (asyncStatemachine.asyncComplete()) {
 processSocketEvent(SocketEvent.OPEN_READ, true);
 }
 break;
 }
 }
 //类:AbstractProcessor
protected void processSocketEvent(SocketEvent event, boolean dispatch) {
 SocketWrApperBase<?> socketWrapper = getSocketWrapper();
 if (socketWrapper != null) {
 socketWrapper.processSocket(event, dispatch);
 }
 }
 //类:AbstractEndpoint
public boolean processSocket(SocketWrapperBase<S> socketWrapper,
 SocketEvent event, boolean dispatch) {
 //省略部分代码
 SocketProcessorBase<S> sc = null;
 if (processorCache != null) {
 sc = processorCache.pop();
 }
 if (sc == null) {
 sc = createSocketProcessor(socketWrapper, event);
 } else {
 sc.reset(socketWrapper, event);
 }
 Executor executor = getExecutor();
 if (dispatch && executor != null) {
 executor.execute(sc);
 } else {
 sc.run();
 }

 return true;
 }
所以,这里最终会调用AbstractEndpoint的processSocket方法,之前看过我前面博客的同学应该有印象,EndPoint是用来接受和处理请求的,接下来就会交给Processor去进行协议处理。
类:AbstractProcessorLight
public SocketState process(SocketWrapperBase<?> socketWrapper, SocketEvent status)
 throws IOException {
 //省略部分diam
 SocketState state = SocketState.CLOSED;
 Iterator<DispatchType> dispatches = null;
 do {
 if (dispatches != null) {
 DispatchType nextDispatch = dispatches.next();
 state = dispatch(nextDispatch.getSocketStatus());
 } else if (status == SocketEvent.DISCONNECT) {

 } else if (isAsync() || isUpgrade() || state == SocketState.ASYNC_END) {
 state = dispatch(status);
 if (state == SocketState.OPEN) {
 state = service(socketWrapper);
 }
 } else if (status == SocketEvent.OPEN_WRITE) {
 state = SocketState.LONG;
 } else if (status == SocketEvent.OPEN_READ){
 state = service(socketWrapper);
 } else {
 state = SocketState.CLOSED;
 }
 } while (state == SocketState.ASYNC_END ||
 dispatches != null && state != SocketState.CLOSED);
 return state;
 }
这部分是重点,AbstractProcessorLight会根据SocketEvent的状态来判断是不是要去调用service(socketWrapper),该方法最终会去调用到容器,从而完成业务逻辑的调用,我们这个请求是执行完成后调用的,肯定不能进容器了,不然就是死循环了,这里通过isAsync() 判断,就会进入dispatch(status),最终会调用CoyoteAdapter的asyncDispatch方法
public boolean asyncDispatch(org.Apache.coyote.Request req, org.apache.coyote.Response res,
 SocketEvent status) throws Exception {
 //省略部分代码
 Request request = (Request) req.getNote(ADAPTER_NOTES);
 Response response = (Response) res.getNote(ADAPTER_NOTES);
 boolean success = true;
 AsyncContextImpl asyncConImpl = request.getAsyncContextInternal();
 try {
 if (!request.isAsync()) {
 response.setSuspended(false);
 }
 if (status==SocketEvent.TIMEOUT) {
 if (!asyncConImpl.timeout()) {
 asyncConImpl.setErrorState(null, false);
 }
 } else if (status==SocketEvent.ERROR) {

 }
 if (!request.isAsyncDispatching() && request.isAsync()) {
 WriteListener writeListener = res.getWriteListener();
 ReadListener readListener = req.getReadListener();
 if (writeListener != null && status == SocketEvent.OPEN_WRITE) {
 ClassLoader oldCL = null;
 try {
 oldCL = request.getContext().bind(false, null);
 res.onWritePossible();//这里执行浏览器响应,写入数据
 if (request.isFinished() && req.sendAllDataReadEvent() &&
 readListener != null) {
 readListener.onAllDataRead();
 }
 } catch (Throwable t) {

 } finally {
 request.getContext().unbind(false, oldCL);
 }
 }
 }
 }
 //这里判断异步正在进行,说明这不是一个完成方法的回调,是一个正常异步请求,继续调用容器。
 if (request.isAsyncDispatching()) {
 connector.getService().getContainer().getPipeline().getFirst().invoke(
 request, response);
 Throwable t = (Throwable) request.getAttribute(RequestDispatcher.ERROR_EXCEPTION);
 if (t != null) {
 asyncConImpl.setErrorState(t, true);
 }
 }
 //注意,这里,如果超时或者出错,request.isAsync()会返回false,这里是为了尽快的输出错误给客户端。
 if (!request.isAsync()) {
 //这里也是输出逻辑
 request.finishRequest();
 response.finishResponse();
 }
 //销毁request和response
 if (!success || !request.isAsync()) {
 updateWrapperErrorCount(request, response);
 request.recycle();
 response.recycle();
 }
 }
 return success;
 }
上面的代码就是ctx.complete()执行最终的方法了(当然省略了很多细节),完成了数据的输出,最终输出到浏览器。
这里有同学可能会说,我知道异步执行完后,调用ctx.complete()会输出到浏览器,但是,第一次doGet请求执行完成后,Tomcat是怎么知道不用返回到客户端的呢?关键代码在CoyoteAdapter中的service方法,部分代码如下:
 postParseSuccess = postParseRequest(req, request, res, response);
 //省略部分代码
 if (postParseSuccess) {
 request.setAsyncSupported(
 connector.getService().getContainer().getPipeline().isAsyncSupported());
 connector.getService().getContainer().getPipeline().getFirst().invoke(
 request, response);
 }
 if (request.isAsync()) {
 async = true;
 } else {
 //输出数据到客户端
 request.finishRequest();
 response.finishResponse();
 if (!async) {
 updateWrapperErrorCount(request, response);
 //销毁request和response
 request.recycle();
 response.recycle();
 }
这部分代码在调用完Servlet后,会通过request.isAsync()来判断是否是异步请求,如果是异步请求,就设置 async = true。如果是非异步请求就执行输出数据到客户端逻辑,同时销毁request和response。这里就完成了请求结束后不响应客户端的操作。
因为之前准备写本篇文章的时候就查询过很多资料,发现很多资料写SpringBoot异步编程都是依赖于@EnableAsync注解,然后在Controller用多线程来完成业务逻辑,最后汇总结果,完成返回输出。这里拿一个掘金大佬的文章来举例《新手也能看懂的 SpringBoot 异步编程指南》,这篇文章写得很通俗易懂,非常不错,从业务层面来说,确实是异步编程,但是有一个问题,抛开业务的并行处理来说,针对整个请求来说,并不是异步的,也就是说不能立即释放Tomcat的线程,从而不能达到异步Servlet的效果。这里我参考上文也写了一个demo,我们来验证下,为什么它不是异步的。
@RestController
@Slf4j
public class TestController {
 @Autowired
 private TestService service;
 @GetMapping("/hello")
 public String test() {
 try {
 log.info("testAsynch Start");
 CompletableFuture<String> test1 = service.test1();
 CompletableFuture<String> test2 = service.test2();
 CompletableFuture<String> test3 = service.test3();
 CompletableFuture.allOf(test1, test2, test3);
 log.info("test1=====" + test1.get());
 log.info("test2=====" + test2.get());
 log.info("test3=====" + test3.get());
 } catch (InterruptedException e) {
 e.printStackTrace();
 } catch (ExecutionException e) {
 e.printStackTrace();
 }
 return "hello";
 }
@Service
public class TestService {
 @Async("asyncExecutor")
 public CompletableFuture<String> test1() throws InterruptedException {
 Thread.sleep(3000L);
 return CompletableFuture.completedFuture("test1");
 }
 @Async("asyncExecutor")
 public CompletableFuture<String> test2() throws InterruptedException {
 Thread.sleep(3000L);
 return CompletableFuture.completedFuture("test2");
 }
 @Async("asyncExecutor")
 public CompletableFuture<String> test3() throws InterruptedException {
 Thread.sleep(3000L);
 return CompletableFuture.completedFuture("test3");
 }
}
@SpringBootApplication
@EnableAsync
public class TomcatdebugApplication {
 public static void main(String[] args) {
 SpringApplication.run(TomcatdebugApplication.class, args);
 }
 @Bean(name = "asyncExecutor")
 public Executor asyncExecutor() {
 ThreadPoolTaskExecutor executor = new ThreadPoolTaskExecutor();
 executor.setCorePoolSize(3);
 executor.setMaxPoolSize(3);
 executor.setQueueCapacity(100);
 executor.setThreadNamePrefix("AsynchThread-");
 executor.initialize();
 return executor;
 }
这里我运行下,看看效果

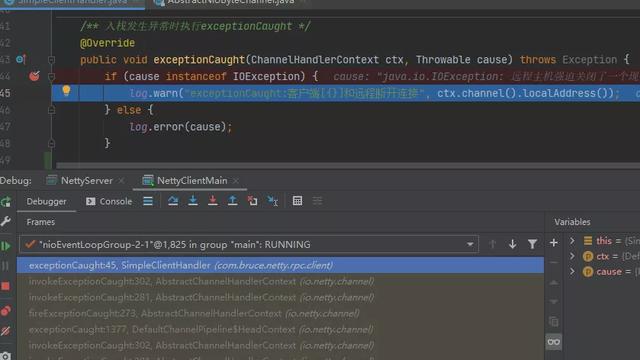
这里我请求之后,在调用容器执行业务逻辑之前打了一个断点,然后在返回之后的同样打了一个断点,在Controller执行完之后,请求才回到了CoyoteAdapter中,并且判断request.isAsync(),根据图中看到,是为false,那么接下来就会执行request.finishRequest()和response.finishResponse() 来执行响应的结束,并销毁请求和响应体。很有趣的事情是,我实验的时候发现,在执行request.isAsync()之前,浏览器的页面上已经出现了响应体,这是SpringBoot框架已经通过StringHttpMessageConverter类中的writeInternal方法已经进行输出了。
以上分析的核心逻辑就是,Tomcat的线程执行CoyoteAdapter调用容器后,必须要等到请求返回,然后再判断是否是异步请求,再处理请求,然后执行完毕后,线程才能进行回收。而我一最开始的异步Servlet例子,执行完doGet方法后,就会立即返回,也就是会直接到request.isAsync()的逻辑,然后整个线程的逻辑执行完毕,线程被回收。
分析了这么多,那么异步Servlet的使用场景有哪些呢?其实我们只要抓住一点就可以分析了,就是异步Servlet提高了系统的吞吐量,可以接受更多的请求。假设web系统中Tomcat的线程不够用了,大量请求在等待,而此时Web系统应用层面的优化已经不能再优化了,也就是无法缩短业务逻辑的响应时间了,这个时候,如果想让减少用户的等待时间,提高吞吐量,可以尝试下使用异步Servlet。
举一个实际的例子:比如做一个短信系统,短信系统对实时性要求很高,所以要求等待时间尽可能短,而发送功能我们实际上是委托运营商去发送的,也就是说我们要调用接口,假设并发量很高,那么这个时候业务系统调用我们的发送短信功能,就有可能把我们的Tomcat线程池用完,剩下的请求就会在队列中等待,那这个时候,短信的延时就上去了,为了解决这个问题,我们可以引入异步Servlet,接受更多的短信发送请求,从而减少短信的延时。
这篇文章我从手写一个异步Servlet来开始,分析了异步Servlet的作用,以及Tomcat内部是如何实现异步Servlet的,然后我也根据互联网上流行的SpringBoot异步编程来进行说明,其在Tomcat内部并不是一个异步的Servlet。最后,我谈到了异步Servlet的使用场景,分析了什么情况下可以尝试异步Servlet。