GitHub Actions[1] 是 GitHub 的持续集成服务[2],于2018年10月推出[3]。它的功能非常强大,每一个 action 都用来执行一种操作,比如抓取代码、运行测试、登录远程服务器,发布到第三方服务等等。将这些 actions 组合起来,就是一个持续集成的过程。当然,这些 actions 都共享在 GitHub 的代码仓库中,我们可以直接引用。
Github Actions 提供了整套服务器环境,服务器规格为:
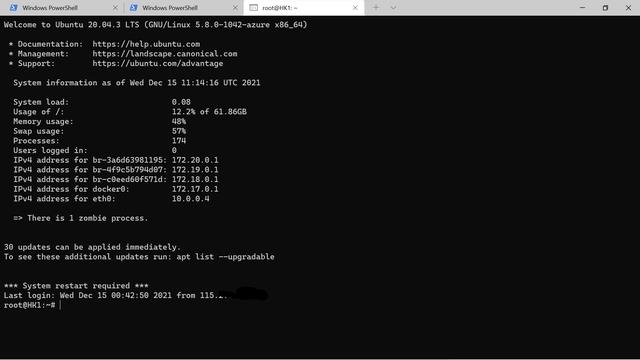
详细系统环境信息如图:

当然,可使用的系统除了 Ubuntu 之外还可以使用 windows Server 2019 和 macOS X Catalina 10.15。
看起来很美好,但实际上 GitHub Actions 本身是不允许直接连接进行交互式操作的,也就是说你无法通过 SSH 来连接服务器。如果有办法能够直接连接到服务器进行交互式操作,那岂不是相当于白嫖了一台或多台 E5 2vCPU/7G RAM/90G SSD 配置的 VPS?
本文就来告诉你如何通过一些奇技淫巧来绕过 GitHub Actions 本身的限制,直接连接到服务器!
注意:请勿用于恶意用途,造成的一切后果比如封号、中美关系恶化、原子弹爆炸、第三次世界大战等后果均与作者无关。
mxschmitt/action-tmate[4]
这是第一个实现 tmate[5] 连接 Actions 服务器的 action ,但此方案在退出连接后不能进行到下一个步骤,所以在实际使用中没有多少价值,只能用于 SSH 连接。不过由于其开天辟地的作用,我决定把它放到第一位。
workflow 文件示例:
name: CI
on: [push]
jobs:
  build:
    runs-on: ubuntu-latest
    steps:
    - uses: actions/checkout@v2
    - name: Setup tmate session
      uses: mxschmitt/action-tmate@v2
csexton/debugger-action[6]
此 action 作者受 mxschmitt/action-tmate[7] 启发,同样是通过 tmate 连接,退出连接后可持续进行下一个步骤,能更好的应用到实际项目中使用。作者可能考虑到为 GitHub 节约资源,默认加了 15 分钟自动断开连接,不过可以通过执行 touch /tmp/keepalive 命令去解除。
workflow 文件示例:
name: debugger-action
on:
  watch:
    types: started
jobs:
  build:
    runs-on: ubuntu-latest
    steps:
     - uses: actions/checkout@v2
      - name: Setup Debug Session
       uses: csexton/debugger-action@master
Action 日志输出:

该方案没有使用 action 来实现,而是另辟蹊径,直接使用 ngrok 来穿透内网,脚本如下:
#!/bin/bash


if [[ -z "$NGROK_TOKEN" ]]; then
  echo "Please set 'NGROK_TOKEN'"
  exit 2
fi

if [[ -z "$USER_PASS" ]]; then
  echo "Please set 'USER_PASS' for user: $USER"
  exit 3
fi

echo "### Install ngrok ###"

wget -q https://bin.equinox.io/c/4VmDzA7iaHb/ngrok-stable-linux-386.zip
unzip ngrok-stable-linux-386.zip
chmod +x ./ngrok

echo "### Update user: $USER password ###"
echo -e "$USER_PASSn$USER_PASS" | sudo passwd "$USER"

echo "### Start ngrok proxy for 22 port ###"


rm -f .ngrok.log
./ngrok authtoken "$NGROK_TOKEN"
./ngrok tcp 22 --log ".ngrok.log" &

sleep 10
HAS_ERRORS=$(grep "command failed" < .ngrok.log)

if [[ -z "$HAS_ERRORS" ]]; then
  echo ""
  echo "=========================================="
  echo "To connect: $(grep -o -E "tcp://(.+)" < .ngrok.log | sed "s/tcp:///ssh $USER@/" | sed "s/:/ -p /")"
  echo "=========================================="
else
  echo "$HAS_ERRORS"
  exit 4
fi
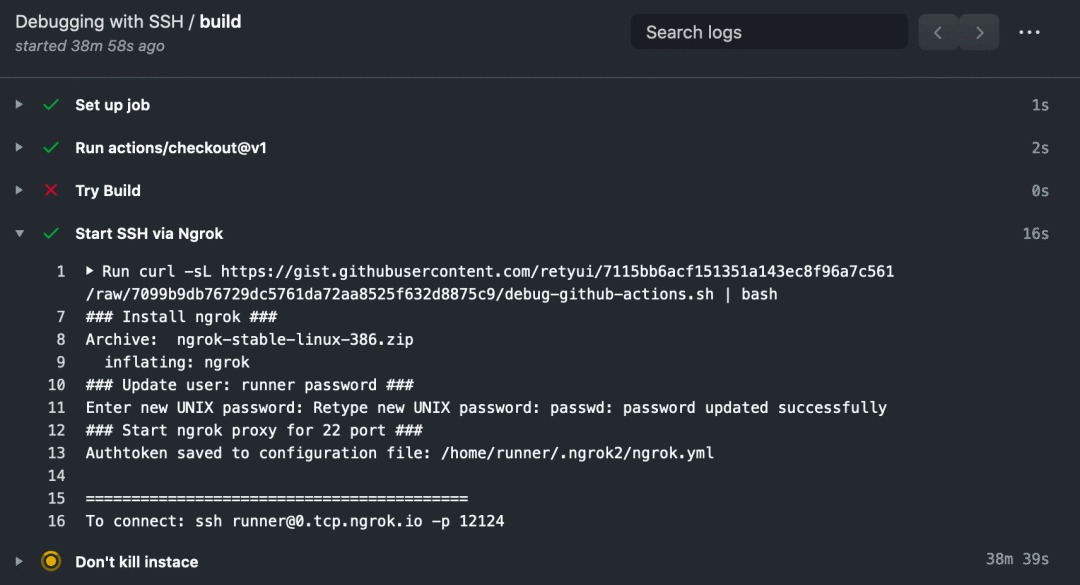
该脚本用来为 SSH 服务建立 TCP 隧道,并打印出通过公网连接远程服务器的命令。
首先需要在 ngrok 的官网[8] 注册一个账户,并生成一个Tunnel Authtoken:https://dashboard.ngrok.com/auth。然后创建如下的 workflow:
name: Debugging with SSH
on: pushjobs:  build:
    runs-on: ubuntu-latest
    steps:     - uses: actions/checkout@v1      - name: Try Build
       run: ./not-exist-file.sh it bloke build
      - name: Start SSH via Ngrok
       if: ${{ failure() }}
       run: curl -sL https://gist.githubusercontent.com/retyui/7115bb6acf151351a143ec8f96a7c561/raw/7099b9db76729dc5761da72aa8525f632d8875c9/debug-github-actions.sh | bash
       env:        # After sign up on the https://ngrok.com/
        # You can find this token here: https://dashboard.ngrok.com/get-started/setup
        NGROK_TOKEN: ${{ secrets.NGROK_TOKEN }}

        # This password you will use when authorizing via SSH
        USER_PASS: ${{ secrets.USER_PASS }}

     - name: Don't kill instace
       if: ${{ failure() }}
       run: sleep 1h # Prevent to killing instance after failure
服务器存活时间默认是 1 小时,可自行调整。这里面的 TOKEN 和 SSH 登录密码最好采用 workflow 中推荐的方式,先在 GitHub 中创建 Secret,然后在 workflow 中引用 Secret。具体步骤可参考官方文档[9]。
Action 日志输出:
最后再次强调:希望大家以学习研究目的来使用,切勿用作其他恶意用途,切勿滥用!
[1]GitHub Actions: https://github.com/features/actions
[2]持续集成服务: http://www.ruanyifeng.com/blog/2015/09/continuous-integration.html
[3]推出: https://github.blog/changelog/2018-10-16-github-actions-limited-beta/
[4]mxschmitt/action-tmate: https://p3terx.com/go/aHR0cHM6Ly9naXRodWIuY29tL214c2NobWl0dC9hY3Rpb24tdG1hdGU=
[5]tmate: https://github.com/tmate-io/tmate
[6]csexton/debugger-action: https://p3terx.com/go/aHR0cHM6Ly9naXRodWIuY29tL2NzZXh0b24vZGVidWdnZXItYWN0aW9u
[7]mxschmitt/action-tmate: https://p3terx.com/go/aHR0cHM6Ly9naXRodWIuY29tL214c2NobWl0dC9hY3Rpb24tdG1hdGU=
[8]ngrok 的官网: https://ngrok.com/
[9]官方文档: https://docs.github.com/cn/actions/configuring-and-managing-workflows/creating-and-storing-encrypted-secrets
[10]SSH 连接到 GitHub Actions 虚拟服务器环境 : https://p3terx.com/archives/ssh-to-the-github-actions-virtual-server-environment.html